Businesses hiring employees must meet Government requirements related to their working conditions, pay and record keeping.
Employee Records
All new Employees must be provided with 3 standard employee documents at the beginning of their employment. These are:
- Tax File Number Declaration > determines the amount of taxes to withhold from their payments
- Superannuation Standard Choice Form > advise the employer of the employee’s choice of super fund
- Fairwork Information Statement > informs employees about their workplace rights and entitlements
The Tax File Number Declaration and Superannuation Standard Choice forms must be filled out by the employee and returned to the employer within 28 days from the start of their employment. Employers must also provide evidence that these forms have been given to the employee at the time of employment. The Tax File Number Declaration must then be lodged with the ATO.
It is also advisable for Employers to provide employees with:
- Employee Forms > to gather additional employment details
- Employment contract > to outline the employment agreement between the two parties
Finally, employers must also issue payslips to each employee within one working day of their payday. Employers who wish to issue payslips by email must obtain written consent from their employees.
Employee details are then added to Xero to process pays, issue payslips and pay superannuation.
Create a new Full-Time or Part-Time Employee
- Go to Payroll > Employees
- Click on [Add Employee] > Add New
è The Employee screen opens
Note: at this stage, the employee screen only includes the [Details] Tab
- Enter the Employee basic information
Note: Date of Birth, Gender and Address are mandatory fields - Click on [Save]
Note: Additional tabs are now displayed on the Employee screen - Click on the [Employment] Tab
è The Employment Tab
- Select/Enter the following details:
- Employment Type > Select Employee
- Income Type > Select the correct Income Type based on the employee's employment type
- Employment basis > Select: Full-time or Part-time
- Start Date > Type the Employee's Employment start date
- Classification > Type the Fair Work Job Classification (or Job Title for Employees above Award)
- Payroll Calendar > Select the Employee's Payroll Calendar
- Employee Group > Select the relevant Employee Group (if applicable)
- Holiday Group > Select the State the Employee resides in
- Include holidays in payslips > Select this option if you are not paying your employees via Timesheets
- Ordinary Earnings Rate > Select main Ordinary Hours Pay Item
Note: this is the main Pay Item where the Employee's entitlements will be calculated from
- Click on + Add a superannuation membership
è The Add a Superannuation Membership pop-up screen opens
- Select/Enter the following details:
- Superannuation Fund > Select the Employee's fund from the list
- Employee Number > Type the Employee's super membership number
- Click on [Add] > [Save]
- Click on the [Taxes] Tab
è The Taxes details Tab
- Select/Enter the following details:
- Tax File Number > Type the Employee's Tax File Number
- Residency Status & Other Tax Options > Select the Employee's Residency status and Tax Options as per the Employee's Tax File Number declaration
- Tax Scale > Select the correct Tax Scale applicable to the Employee
Note: Xero only supports the Regular Income Type, if you select a different tax scale you will be required to manually calculate the tax withholding in each pay run - Tax offset and variations > Select any tax variation applicable to the employee
- Click on [File Now]
è The Authorisation To File screen opens
- Click on [File Now]
è The Tax File Declaration is lodged electronically to the ATO - Click on the [Leave] Tab
è The Leave Tab
- Click on [Assign Leave Type]
è The Assign Leave Type screen opens
- You will need to add both Annual Leave and Personal Leave
- Select/Enter the following details:
- Leave > Select: Annual Leave or Personal Leave
- Leave Calculation Method > Select: Based on Ordinary Earnings
- Hours of leave accrued annually by a full-time employee > Type: 152 (Annual Leave) or 76 (Personal Leave)
- Hours a full time employee works in a week/fortnight/month > Type: 38 (Week), 76 (Fortnight) and 152 (Month)
- Opening Balances > Type: 0 (unless you are entering existing Employees coming from a previous Payroll system)
- On Termination Unused Balance is > Select: Paid Out (Annual Leave) or Not Paid Out (Personal Leave)
- Click on [Save]
- Click on the [Bank Accounts] Tab
è The Bank Accounts Tab
- Enter the following details:
- Statement Text > This statement shows on the Employee's Bank Account (make sure it includes your Company name)
- Account Name > Type the employee's Bank Account's name
- BSB > Type the Employee's Bank Account's BSB number
- Account Number > Type the Employee's Bank Account's number
- If the Employee would like to split their pay in more than one account, click on Add Another Bank Account and type the additional Bank Accounts' details
- You can then distribute the Employees wages by amount or percentage across the different Bank Accounts
- Click on [Save]
- Click on the [Pay Template] Tab
è The Pay Template Tab
- Add any relevant Pay Item lines applicable to this Employee (generally stipulated by the Award or Employment Agreement)
Note: to save the Pay Template you must at least add one Earning Lines and one Superannuation Line - To add the first Earning Line, click on [Add Earnings Line]
è The Add an Earnings Line screen opens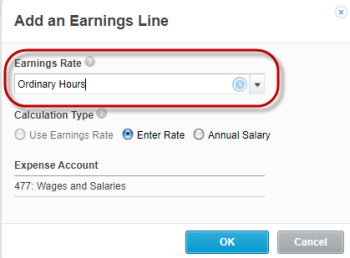
- Select the following details:
- Earnings Rate > Select: Ordinary Hours
- Calculation Type > Select: Enter Rate (to enter an hourly rate) or Annual Salary (to enter the Employee's Annual Salary)
- Click on [OK]
- Enter Rate > Type the Weekly/Fortnightly/Monthly hours and the Hourly Rate as per the Employment Agreement or classified Award
Annual Salary > Type the Weekly hours and the Annual Salary as per the Employment Agreement - Add any additional Earning Lines as stipulated in either the Award or Employment Agreement (i.e. Allowances, Weekend Rates or Overtime)
- Click on [Add Superannuation Line]
è The Superannuation Line
- Confirm/Modify the following details:
- Calculation Type > Select: Statutory Rate
- Expense Account > Select: Superannuation Expenses
- Payment Frequency > Select either Quarterly or Monthly (depending on how frequently the business wishes to pay Superannuation)
- Click on [OK]
- Add any additional Deductions, Expenses and Superannuation lines as agreed with the Employee
- Once you have added all relevant Pay Item Lines click on [Save]
|
Rate this Topic:
|
|||
|