Xero My Payroll is a secure online Portal that allows Employees to update their personal details, view payslips and submit leave applications, timesheets and expense reimbursements for approval.
Access to Xero My Payroll can be included with your standard Xero User Access or separately. Employers can invite Employees to Xero My Payroll via Xero Payroll. Once accepted, the Employees invited to My Payroll are listed on the User Screen. The Xero My Payroll User access can then be increased by adding other functions to Xero as well.
Xero My Payroll can be used from a Web Browser or by downloading the Xero Me app on either an iPhone or an Android Smartphone.
Xero MyPayroll includes a number of Tabs:
- Overview > Where an Employee can view their salary details and recent Leave Applications;
- My Details > Where an Employee can check and update their personal details;
- Payslips > Where an Employee can view all their Payslips;
- Leave > Where a Full-Time or Part-Time Employee can request leave;
- Timesheets > Where an Employee can submit Timesheets for Approval.
Update Personal Details in Xero My Payroll
- Log into Xero MyPayroll at https://login.xero.com/identity/user/login
- From Xero My Payroll go to the [My Details] Tab
è The My Details screen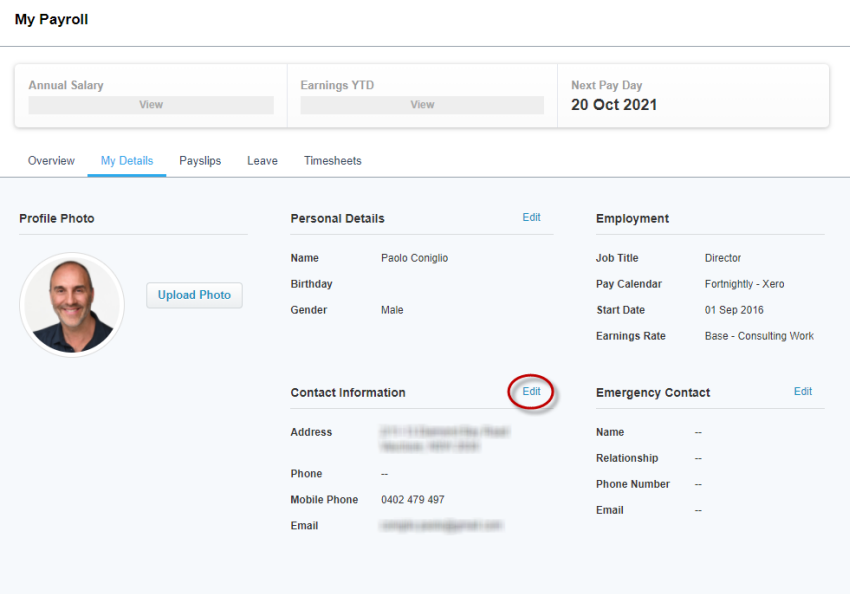
- From this screen you can update the following details:
- Personal Details (Name, DOB and Gender)
Note: DOB is not shown on the portal - Contact Information (Address, Phone and Email)
- Emergency Contact Details
- Personal Details (Name, DOB and Gender)
- To update any of the above details, click on Edit next to the relevant section
è The Edit screen section opens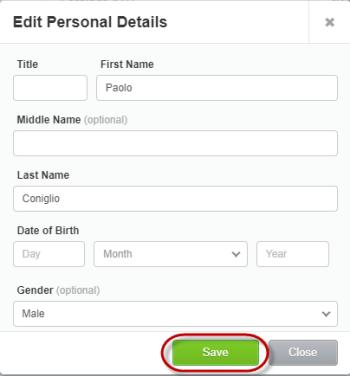
- Update the relevant information and click on [Save]
Note: you cannot update your Job Title, Base Pay and Bank Account details via Xero My Payroll
View and Download Payslips in Xero My Payroll
- From Xero My Payroll go to the [Payslips] Tab
è The Payslips screen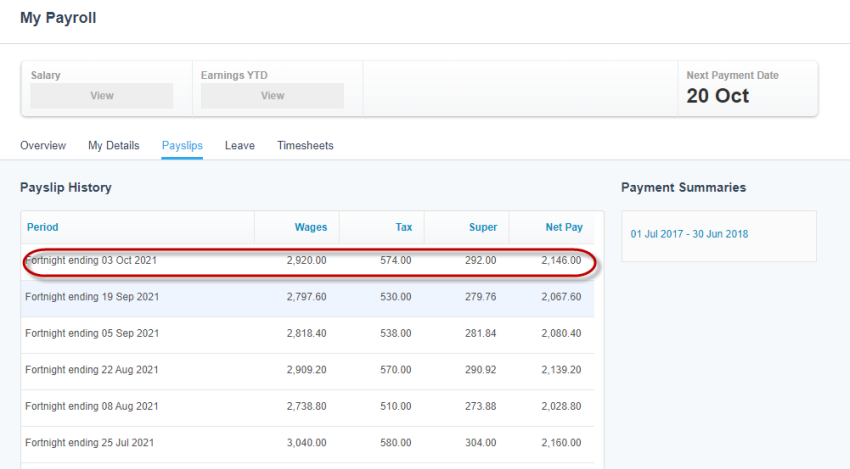
- To open a Payslip click on the Payslip Date
è The Payslip is displayed on the screen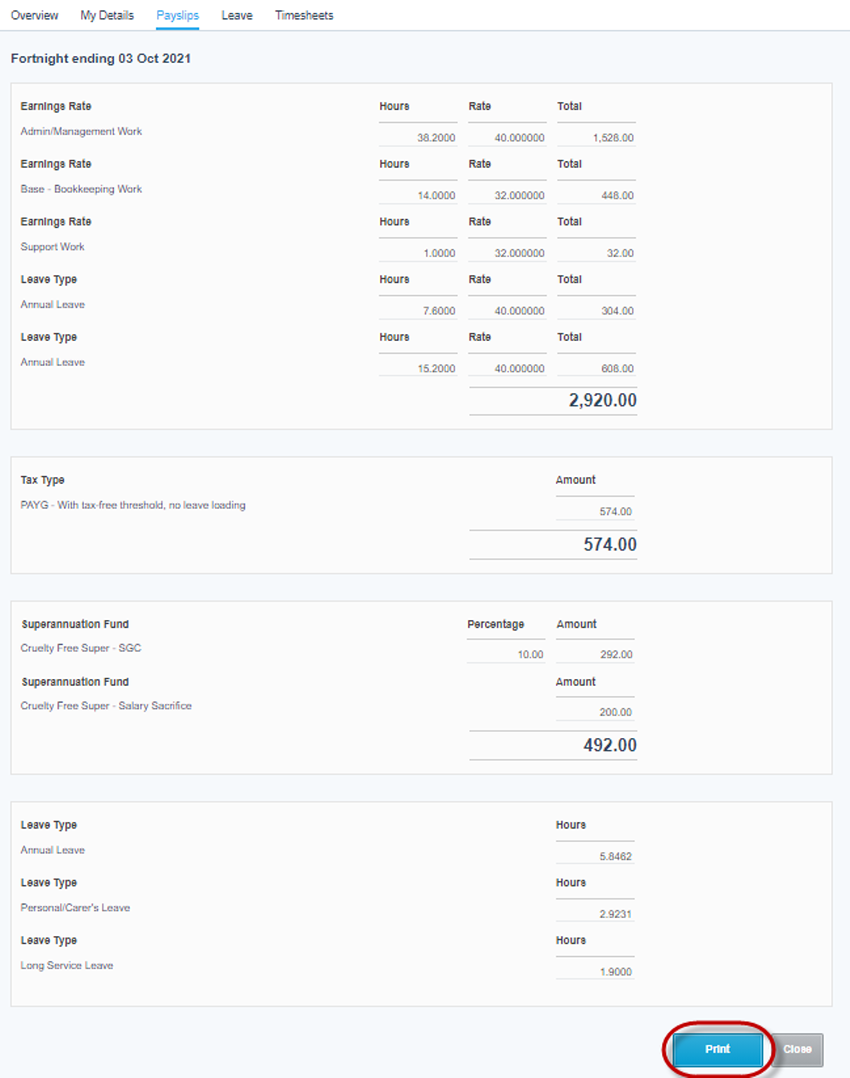
- To download the Payslip click on [Print]
è The Payslip PDF is displayed on the screen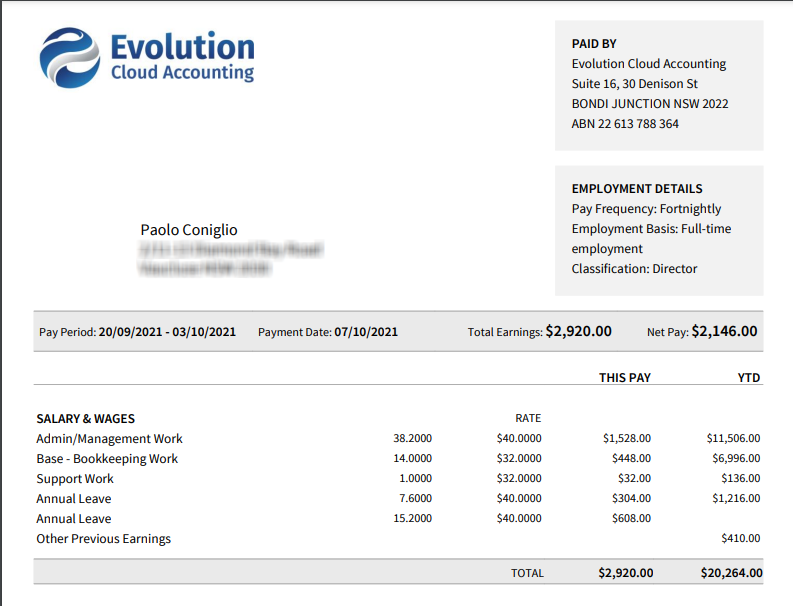
- From this screen, you can download the Payslip into your computer or print it
Request Leave in Xero My Payroll
- From Xero My Payroll go to the [Leave] Tab
è The Leave screen - Click on [New Leave Request]
è The New Leave Request screen opens - Select/Enter the following details:
- Type of Request > Select the Type of leave you wish to apply for
- Description > Type a general description for your leave request
- Approver > Select your Approver
- Start/End Date > Enter the first and last day of the leave request
- Hours > Depending on the way the specific leave type has been set up, this may default to a specific number of hours or to 0. Make sure the number of leave hours in this field correctly reflect the hours you work during the leave period you have requested (make sure the hours exclude any Public Holidays included in the Leave period requested)
- Click on [Request]
è The Leave Request is sent to the Approver
Submit Timesheets in Xero My Payroll
- From Xero My Payroll go to the [Timesheets] Tab
è The Timesheets screen opens - Click on [Add Timesheet]
è The Add Timesheet screen opens - Select the relevant Payroll Period and click on [Continue]
è The Timesheet opens on the screen - Select/Enter the following details:
- Earnings Rate > Select the applicable Earnings Rate
- Tracking Category > Select the relevant Tracking Category (if applicable, this could be Jobs, Department, Location or something else)
- Hours > Enter the number of hours worked in each day applicable to the selected Earnings Rate
- If you wish to add more Lines (i.e. Overtime or Travel Allowance), click on [Add another Line] and repeat the above step
- Click on [Submit]
è The Timesheet is sent for approval
|
Rate this Topic:
|
|||
|
