Bunnings trade payable invoices and adjustment notes are available for download from the Bunnings PowerPass Portal.
Due to the high volume of transactions, Bunnings' purchases and returns should be downloaded and published to Xero once per week. The account also has a substantial number of Returns / Credit Notes which are not always deducted in the correct period by Bunnings' Accounts Receivable Department.
First Grade Trades/Builders also make several top-up payments each month to ensure they have enough credit to continue to purchase tools and materials during the month.
To facilitate the Accounts Payable reconciliation process, we have created a separate Liability account used to post all Invoices, Credit Notes' and top-up payments during the month.
Similarly to any other large Trade Accounts, all Invoices and Credit Notes should be reconciled against the EOM Statements from Bunnings. Once the Statement is reconciled, all invoices/credit notes listed in the Statement should be paid to the Bunnings Trade Liability Account.
The Bunnings Trade Account's outstanding balance as of the statement date should match the outstanding balance on the Statement.
Bunnings Trade Account Reconciliation - Workflow Summary
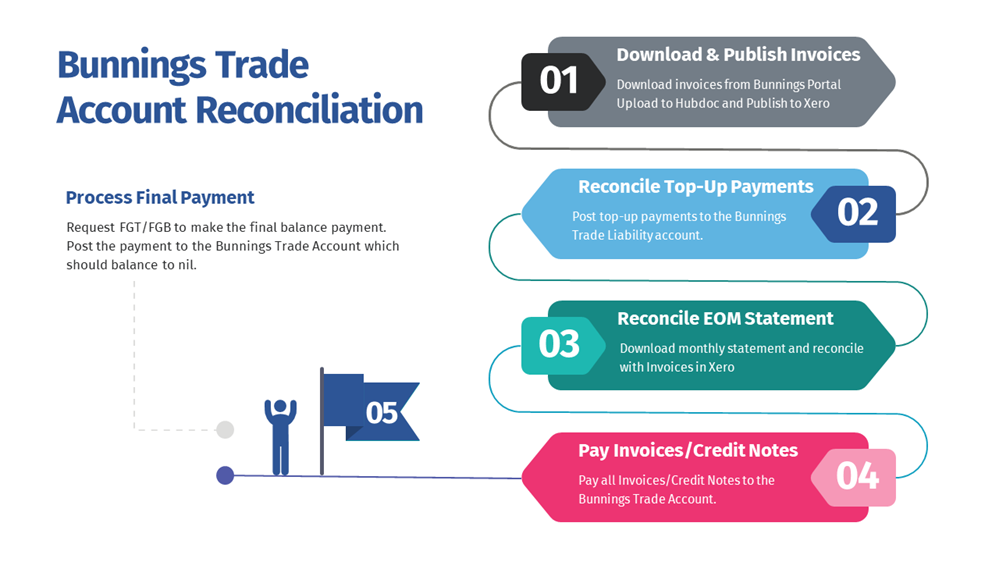
01 Download Invoices from Bunnings Portal and Upload them to Hubdoc
This process is the same as with any other Clients' Bunnings Trade Accounts
- Download the Bunnings Purchases and Returns from Bunnings PowerPass once per week
Note: make sure you check the date range you used in the previous download to avoid downloading duplicate purchases (although Hubdoc should detect the duplicate documents) - Upload the Invoiced into Hubdoc to automatically split them into individual files
02 Reconcile the Top-Up Payments
- From the Bank Feeds' screen find the Bunnings Trade Account top-up payment
è The Bank Feeds screen
- Select the [Transfer] Tab
- In Select a bank account select the Bunnings Trade Account
- Click on [OK]
03 Reconcile EOM Statements
- Login into Bunnings PowerPass
è The Bunnings PowerPass Portal
- Click on Statements
- Select the [Statements] Tab
è The Bunnings PowerPass Statements screen opens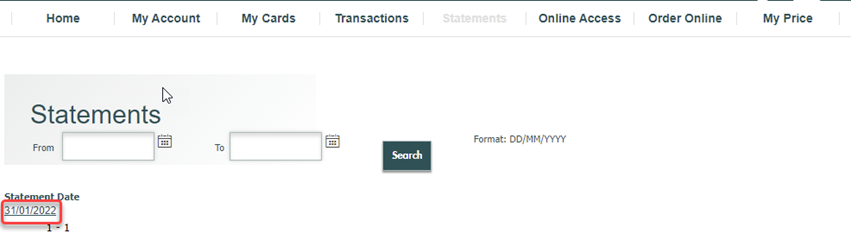
- You can either search using the dates fields for previous statements or download the latest statement directly from the Statement Date link
è The Statements downloads into your download folder - In Xero go to Accounting > Reports
- Select the [Custom] Tab
- Select the Report: Payables - Bunnings EOM Statement Reconciliation
è The Bunnings EOM Statement Reconciliation Custom Report
- Make sure the set Custom Dates are the same as the Bunnings' Statement, then click on [Update]
- Click on [Export] > Excel
- Compare the Payable transactions from the Xero report against the Bunnings Statement. Common issues are:
- Adjustment Notes in Bunnings published as Payable Invoices in Xero > Download the PDF document, void the Payable invoice in Xero and re-create the transaction as a Payable Credit Note;
- Purchases paid directly at the store that are not listed in the Bunnings Statement > Change the Contact in Xero to Bunnings (Cash Purchases);
- Payable Credit Notes not showing in the Bunnings Statement > Credit Notes are often allocated the following months. Do not void Credit Notes if there is paperwork attached;
- Add any missing purchase transactions and rectify any issue until all payable invoices and Adjustment Notes listed/allocated in the Statement are in Xero
04 Pay Invoices and Credit Notes to the Bunnings Trade Account
Pay Bunnings Payable Invoices
- Go to Businesses > Purchases Overview
- Click on Awaiting Payment
è The Purchases Overview - Awaiting Payment screen
- In the Search field select/enter the following search criteria:
- Enter Reference, Contact or Amount > Type: Bunnings
- Search Within > Select: Transaction date
- Start Date & End Date > Select the same period as the Bunnings Statement
- Select each Invoice listed on the Bunnings Statement
Note: as you select each invoice Xero will display a subtotal of all Invoices due Amounts - Once you have selected all the Invoices click on [Batch Payment]
è A confirmation message is displayed
- Click on [Pay ## bills]
è The Make payments screen opens
- Select the Bunnings Trade Account and click on [Continue to review bills]
- Set the Batch Payment date to the end of the Statement month and click on [Continue to payment summary]
- Click on [Finish and view batch]
- Exit the Batch Payment Screen
Pay the Credit Notes to the Bunnings Trade Account
- Go to Contacts > Suppliers
- Open the Bunnings Trade Contact
- Open the first Credit Note allocated in the Statement
è The Bunnings Credit Note
- In Receive a cash refund select/enter the following details:
- Amount > confirm the amount of the credit note as listed in the Bunnings Statement
- Date > Type the last day of the Statement period
- Paid To > Select the account: Bunnings Trade Account (803)
- Click on [Add Refund]
- Repeat the above steps for all Credit Notes applied in the Bunnings Statement
Reconcile the Bunnings Trade Account
- From the Xero Dashboard go to the Bunnings Trade Account
è The Bunnings Trade Account Dashboard widget
- Click on the ellipsis icon and select Account Transactions
è The Bunnings Trade Account Transactions screen opens
- Check the Account Balance as of the date of the Statement and ensure the payable balance is the same as the Statement Balance
è The Bunnings Statement
- Select all the transactions posted into the Bunnings Trade Account for the Statement period
- Click on [More] > Mark as Reconciled
è The Transaction Status for the selected transactions changes to Reconciled
05. Process Balance Payment
- Confirm with FGT/FGB the Bunnings Statement for the month has been reconciled
- When the FGT/FGB makes the balance payment, process the payment as a Transfer to the Bunnings Trade Account (same as the top-up payments)
|
Rate this Topic:
|
|||
|