Time in Karbon can be tracked either by using the Timer inbuilt within Karbon or by using a time tracking device outside of Karbon and then manually adding the time tracked as a Time Entry.
The Timer can be accessed in three ways:
- Using the Timer Icon
- From the Work Item
- From the Contact
Tracking Time using the Timer Icon
- Click on the Timer icon
 on the top right-hand side of the screen
è The Start Timer screen is displayed
- Select the following details:
- Client > Select the Client Organisation Contact
- Work > Select the Work Item you are working on (if applicable)
- Role > Select the Job Role you have been assigned in the Work Item
- Task Type > Select the Task Type you have been assigned in the Work Item
- To start the Timer click on the Play icon

Note: you do not have to select all the above details when you start the timer. You can simply click on the Play icon and then select the Time Entry details when you stop the timer.
è The Timer starts and is displayed on the Karbon bar
- From the Top Bar, you can pause and re-start at any time. Once you stop the timer Karbon will prompt you to confirm a Time Entry and assign it to the Client, Job Role and Task Type assigned. The final step is to enter a brief bullet-point description of the work you have completed during the time.
Note: if you have stopped the Timer by mistake you can click on Cancel and continue your work.
è The Confirm Time Entry screen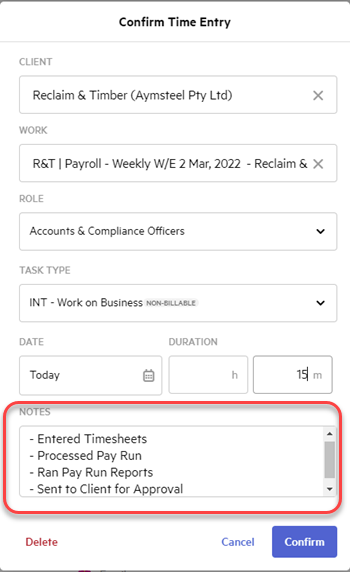
- Click on [Confirm] to save the Time Entry
Tracking Time from Work Items
- Open the Work Item and select the [Time & Budget] Tab
è The Work Item Time & Budget Tab
- Click on [Start Timer] to start tracking Time
è The Timer automatically starts
- You can stop the timer from the top Menu Bar or by clicking on [Stop Timer] from the [Time & Budget] Tab. When you stop the timer, Karbon will prompt you to Confirm the Time Entry
è The Confirm Time Entry screen
- When you confirm the Time Entry make sure you select the same Job Role and Task Type assigned to you in the Budget Estimate section of the Work Item
- Click on [Confirm] to save the Time Entry
Tracking Time from Contacts
As the majority of bookkeeping functions are set up as Work Items, most clients' billable or non-billable time should always be tracked against the Work Items. However, if you need to track any billable activities that are not related to a Work Item, these should always be tracked against the Organisation Contact, not the Individual.
Internal Non-billable activities are recorded directly against the Organisation Contact: Evolution Cloud Admin. Common internal Non-billable activities are:
- Checking your emails > Task Type: INT - Clear Inbox;
- Attending Staff Meetings > Task Type: INT -Meetings;
- Attending Remote or on-site Training > Task Type: INT - Training & Education;
- Taking Leave or Public Holiday > Task Type: INT - On Leave or Public Holidays;
- Other Admin Duties (submitting timesheets, performing cyber security checks etc) > Task Type: INT - Admin Work.
- Open the Organisation Contact and select the [Time & Budget] Tab
è The Work Item Time & Budget Tab
- Click on [Start Timer] to start tracking Time
è The Timer automatically starts
- You can stop the timer from the top Menu Bar or by clicking on [Stop Timer] from the [Time & Budget] Tab. When you stop the timer, Karbon will prompt you to Confirm the Time Entry
è The Confirm Time Entry screen
- When you confirm the Time Entry for Internal non-billable Activities, select your Job Title as the Job Role and the relevant Internal Task Type related to your activity
- Click on [Confirm] to save the Time Entry
|
Rate this Topic:
|
|||
|