Using Pinch Payments Businesses can set up recurring Direct Debit payments for their customers. Pinch-Payments defines these as Pre-approval requests, these requests are a payer's authority to have their account debited by the Business for future invoices or payments. Direct Debit payments can be set up to automatically collect future invoice payments on the Invoice Due Date or as recurring payments for a set amount (such as subscription payments).
There are two ways to set up recurring payments in Pinch Payments:
- The customer can enable the recurring payment option after receiving a Xero invoice;
- A Pre-Approval request can be emailed to the customer using the Pinch Payment portal.
Customise the Pre-Approval Emails
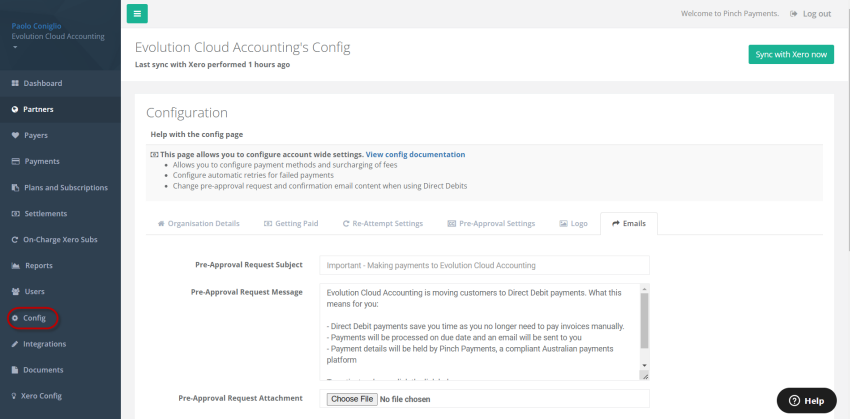
Pinch Payments will send the Pre-approval Request via email. When the customer accepts the Pre-approval Request, a confirmation email is also sent from Pinch Payments. Both request and confirmation email messages are configurable in the Pinch Payments Portal.
- Log into the Pinch Payment Portal
è The Pinch Payments Portal
- Select the [Config] Tab and from the Configuration screen select the [Emails] Tab
- From this screen, you can amend the Pre-Approval Request and/or Confirmation email messages (including the email subject and the ability to include attachments)
- Once you have updated the email messages, click on [Save Changes]
Send an individual Pre-approval Request
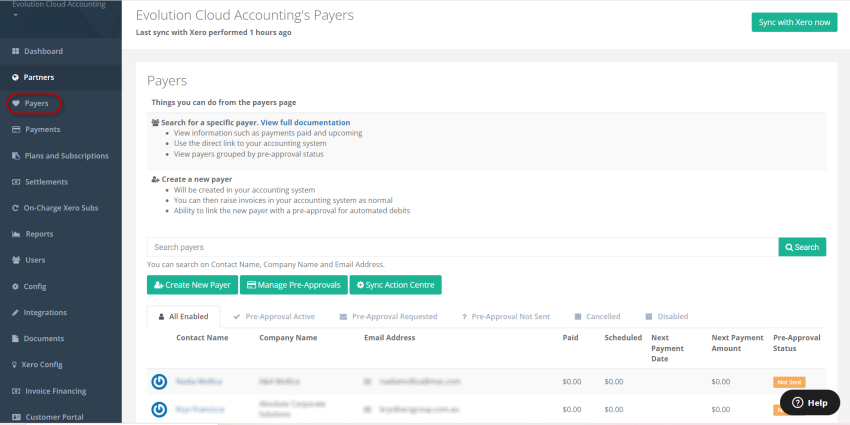
- From the Pinch Payment Portal select the [Payers] Tab
è The list of all your payers (Xero Customers) appears on the screen
- Find the payer to whom you wish to send the Pre-Approval request or add (create) a new payer
è The Payer Details screen opens
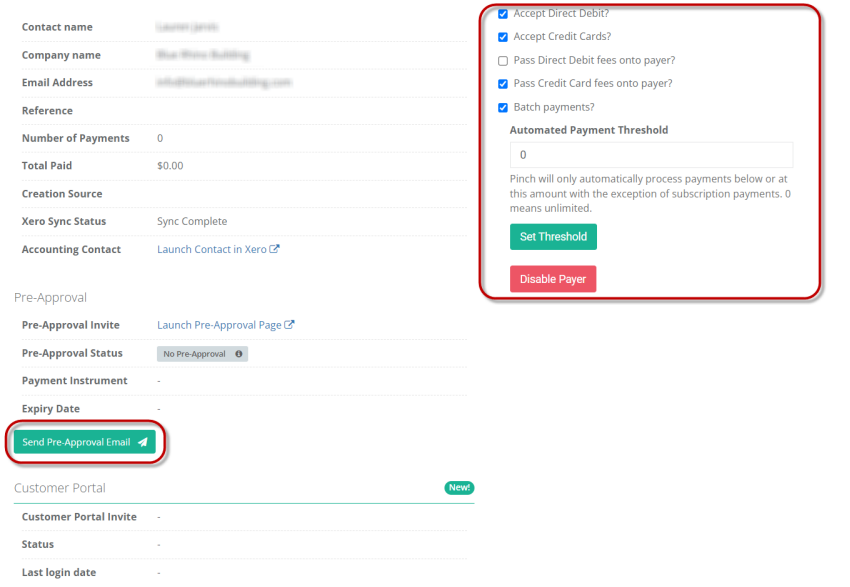
- From the Payer's profile, you can choose the type of accepted payment for the customer to choose and also set a payment threshold. Finally, you manage whether the payment surcharges should be passed to the customer by payment type (Bank Account or Credit Card)
- Click on [Send Pre-Approval Email]
è The Pre-Approval Request is sent to the Customer - Once the customer completes and accepts the pre-approval request an email confirmation is sent to both the Business and the Customer
è The Pre-Approval Email Confirmation sent to the Business
Send multiple Pre-approval Requests at the same time
Pinch Payments also allows you to send Pre-approval requests to multiple payers at the same time.
- From the [Payers] Tab
è The Payers screen - Click on [Manage Pre-Approvals]
è The list of all payers not currently pre-approved for automatic debits is displayed on this screen - You can filter the payers by the following options:
- Status
- Have an Email Address
- Have Been Invoiced
- Select the Payers you wish to send the Pre-Approval Request
- Click on [Send Pre-approvals (XX)]
è The Pre-Approval Request is sent to the selected Customers
Set Up a Payment or Subscription Plan
Pinch Payments gives Businesses the ability to create an extensive range of personalised payment plan cycles. Pay cycle options include the ability to collect an initial payment (i.e. a deposit) and/or recurring payments. Some of the examples payment plans could be used for are:
- A periodical retainer;
- A periodical subscription;
- An instalment plan for a large unpaid invoice
To set up a Payment or a Subscription Plan
- From the Pinch Payment Portal, select the [Plans and subscriptions] Tab
è The Plans and subscriptions screen opens - Click on [Add Payment Plan] or [Add Subscription Plan]
è The All Plans / New Plan screen open - Select/Enter the following options:
- Plan Type > Select if you wish to:
- Generate an invoice for each payment > Pinch Payments will generate an invoice for each payment and sync it to Xero. This option is suitable for recurring ongoing payments and progress payments
- Generate one Single Invoice for the total of the debt > Pinch Payments will generate an invoice for the full amount and sync it to Xero. The payment will then be automatically allocated to this invoice. This option is suitable for annual contracts with ongoing retainers
- Breakdown an Existing Invoice > Pinch Payments will break down the existing invoice from Xero into multiple payments. The payments will then be allocated to the invoice. This option is suitable for payment plans organised for existing outstanding invoices.
- Invoice Template >Select a Xero Branding Theme you wish to use to generate the invoice from Pinch Payments
- Chart of Accounts > Select the income account to assign to the invoice
- Payment Dates > Select if you wish to start the payment plan immediately or on a specific day of the month
- Fixed Payment > Enter an initial payment amount (i.e. a Deposit) to be collected prior to the recurring payments
- Recurring Payments > Enter the recurring payment amount, frequency (day, month year) and number of payments/instalments
- Plan Name > Enter a name for the Payment Plan (internal use only)
- Display Name > Enter a name for the Payment Plan (visible to Customer)
- Terms Link > You can enter a Payment Terms & Conditions web page which will be visible to customers
- Plan Type > Select if you wish to:
- Click on [Create Plan]
- To assign the payment plan to one or more customers, select the [Payers] Tab and find the payer
è The Payer Details screen - Scroll down to the Subscriptions section and click on [+Add Subscription]
è The Add Subscription Plan screen opens - Assign the Payment Plan
- Select the option Schedule for a future date and select the start date of the Payment Plan
- Click on [Create Subscription]
|
Rate this Topic:
|
|||
|
