Insurance costs are invoiced by the Insurance Companies for normally a 12 month period. However, the cost of the insurance should be equally distributed through the Profit & Loss across 12 months. This allows the Business to have more accurate visibility of their annual costs.
This Knowledge Article covers how to create the Insurance Purchase transaction.
Understanding Insurance Costs
Insurance Cost Components
When you create an Insurance Purchase you need to split the cost of the various components of the insurance, as they have different GST implications:
- Premium > GST on Expenses
- Levies > GST on Expenses
- Brokers Fees > GST on Expenses
- Stamp Duty > BAS Excluded
Note: you can add all the components subject to GST together and just separate the Stamp Duty in the Purchase Transaction.
This breakdown is normally displayed on the insurance invoice
Posting the full insurance cos
You will then need to post the Insurance cost to an Asset Account called 'Prepaid Insurance'. This allows the Business to recover the full value of the GST, whilst allowing to distribute the insurance cost evenly across 12 months.
Paying the Insurance Purchase
The Client may decide to either:
- Pay the invoice in full > in this case, you will then match the payment to the invoice from the Bank Feeds (the same as any other invoices)
- Paying in Instalments > in this case, you will pay the invoice in full to a liability account 86X - Financed Insurance
Recording the Purchase Transaction
- Go Contacts > Suppliers
- Check if the Insurance Company is already set up as a Supplier Contact, if not create the Insurance Company as a new Contact.
- Click on [New] > Bill
è The New Bill screen opens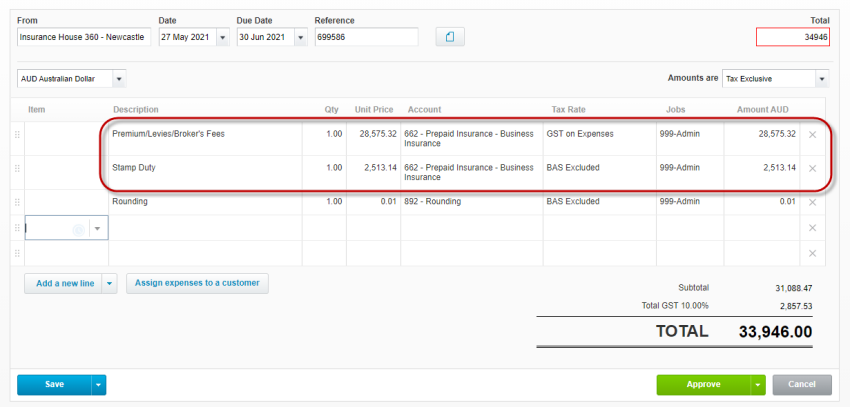
- Select/Enter the following details:
- From > this field should be pre-populated with the Supplier contact
- Date > Enter the invoice date
- Due Date > Enter the due date (if available), if not, enter the start date of the policy
- Reference > Enter the Invoice Number
- Amounts Are > Make sure this is set to Tax Exclusive
- Tab into the main part of the invoice and then select/enter the following details:
- Line 1:
- Description > Type: Premium/Levies/Brokers Fees
- Qty > Type: 1
- Unit Price > Type the total Ex GST
Note: you can copy this value directly from the EOFY Insurance Tracker worksheet - Account > Select the asset account: 66X - Prepaid Insurance - #insurancetype or #insurancesupplier
- Tax Rate > Make this is set to GST on Expenses
- Line 2:
- Description > Type: Stamp Duty
- Qty > Type: 1
- Unit Price > Type the total Stamp Duty
Note: you can copy this value directly from the EOFY Insurance Tracker worksheet - Account > Select the asset account: 66X - Prepaid Insurance - #insurancetype or #insurancesupplier
- Tax Rate > Change to BAS Excluded
- Line 1:
- Make sure the total of the purchase matches the Insurance invoice
- Click on the attachment icon and attach the Insurance Invoice
- Click on [Approve]
Paying the Insurance Transaction to the Finance Account
If the Business has decided to pay the cost of the insurance in instalments through a Finance plan, this invoice needs to be paid to the relevant Financed Insurance account.
- After you have approved the invoice got to the Make a payment section

- Select/Enter the following details:
- Amount Paid > confirm the full amount of the invoice
- Date > use the same date as the Invoice date
- Paid From > Select the Financed Liability account
- Click on [Add Payment]
|
Rate this Topic:
|
|||
|